c++ 中的 header 文件
通过 header 文件来 声明,只需要 include 相对应的 header 文件就可以 正确的链接到对应的函数
log.h
1
2
3
4
5
6
| #ifndef LOG
#define LOG
void Log(const char* message);
#endif
|
log.cpp
1
2
3
4
5
6
7
8
| #include <iostream>
#include "log.h"
void Log(const char* message) {
std::cout << message << std::endl;
}
|
使用:
1
2
3
4
5
6
7
| #include "log.h"
int main() {
Log("hahahaha");
}
|
指针和引用:
关于 int* p 和 int *p 两种写法的说明:
int* p 其中 int* 是一种复合类型,表示 p 为 一个指向 int 的指针。
int* p1,p2; 这样写,只能说明 p1 是 一个指向 int 的指针,p2 是一个int。
int p1 ,p2 ,可以清晰的说明,p1 和 p2 是两个指向 int 的指针
int& ref 和 int &ref 同理。
面对比较复杂的指针或引用的声明语句时,从右往左阅读有助于弄清其真实含义。
1
2
3
4
5
6
7
8
9
10
11
12
13
14
15
16
17
18
19
20
21
22
23
24
25
26
27
28
29
30
| #include <iostream>
#include <string.h>
using namespace std;
#define LOG(x) cout << x << endl;
int main() {
const void* ch = nullptr;
int var = 8;
int* ptr = &var;
*ptr = 10;
char* buffer = new char[8];
memset(buffer, 0, 8);
char** ptrptr = &buffer;
LOG(buffer[0] + "xx");
LOG(ptrptr);
delete[] buffer;
int a = 5;
int& ref = a;
ref = 7;
LOG(ref);
}
|
const:
变量上的 const
注意:const 和 * 的相对位置,相对位置不同,const的含义也不同。
1
2
3
4
5
6
7
8
9
10
11
12
13
14
15
16
17
18
19
20
| int* something = new int;
*something = 11;
const int* a = new int;
a = (int*)&something;
int const* aa = new int;
int* const b = new int;
*b = 44;
const int* const c = new int;
std::cout << "val: " << *c << " addr: " << c << std::endl;
const int &num = 1;
num = 2;
|
类和方法上的const
1
2
3
4
5
6
7
8
9
10
11
12
13
14
15
16
17
18
19
20
21
22
23
24
25
26
27
28
29
30
31
32
33
34
35
36
37
38
39
40
41
42
43
44
45
| #include <iostream>
class Entity {
private:
int mX;
int mY;
int* mZ;
mutable int var;
public:
int getX() const
{
var = 333;
return mX;
}
void setX(int x)
{
mX = x;
}
const int* const getZ() const
{
return mZ;
}
};
void printEntity(const Entity& e) {
std::cout << e.getX() << std::endl;
};
int main() {
Entity e = Entity();
e.setX(22222);
printEntity(e);
}
|
static
class 或 struct 外的 static:link 局部可见,只对当前cpp 文件内部可见
class 或 struct 内部的 static: 与java 一致,类所有实例共享的。
构造函数 和 析构函数
虚函数(相当于java 中的被 override的函数 ) 和 纯虚函数(相当于java中的接口 或抽象方法)
虚函数表
虚函数的存在 可以让 c++ 支持多态
override 是 C++ 11 新增用于标记 override的方法,推荐写上。但是需要被override的方法不可以不写virtual
1
2
3
4
5
6
7
8
9
10
11
12
13
14
15
16
17
18
19
20
21
22
23
24
25
| class Entity {
public:
Entity()
{
std::cout << "oncreate构造函数" << std::endl;
}
~Entity()
{
std::cout << "ondestory析构函数" << std::endl;
}
virtual void print() {
std::cout << "virtual fun can be override" << std::endl;
}
}
class Player : public Entity
{
void print() override {
std::cout << "override virtual function" << std::endl;
}
};
|
可见性 in c++
private,protected 和 public ,基本与java 相同。不同的是,如果不写,c++ 默认的可见性 是 private 的, 即使是 构造函数也是如此, 所以构造函数上需要 加上 public。
friend(友元)是一个关键字,它可以把其他函数或类标记为当前类的 friend。友元可以访问到类的private 变量或函数。
string in c++
1
2
3
4
5
6
7
8
9
10
11
12
13
14
15
16
17
18
19
20
21
22
23
24
25
26
27
28
29
30
31
32
33
34
35
36
37
38
39
40
41
42
43
44
| #include <iostream>
#include <array>
#include <string>
void printStr(const std::string& str) {
std::cout << str << std::endl;
}
int main() {
const char* str = "hahaha";
const wchar_t* name = L"xixi";
const char16_t* name2 = u"zoer";
const char32_t* name3 = U"yasuio";
std::string str2 = "xixixi";
std::wstring str3 = L"mengduo";
std::u16string str4 = u"thees";
std::u32string str5 = U"threno";
str2 += " hello";
bool contains = str2.find("xi") != std::string::npos;
printStr(str2);
const char* longstr = R"(line1
line2
line3
line4)";
std::string longstr2 = R"(line1
line2
line3
line4)";
printStr(longstr2);
}
|
the new 关键字
new:在堆上找到一块连续的符合当前数据类型大小的内存块,然后返回它的内存地址(指针)。并且分配完内存后,会调用该对象的构造函数。
placement new
1
2
3
4
5
6
7
8
9
10
11
12
13
14
|
Entity e = Entity();
Entity* ep = new Entity();
delete ep;
int* arr = new int[5];
delete[] arr;
|
当在栈上无法创建对象时,才在堆上去创建。栈上创建的对象不需要关心生命周期。
例如:对象的作用域需要是全局,对象的size 很大,等情况 才在堆上去创建对象,然后自己去管理该对象的生命周期。
调用 new 关键字时,会调用底层函数 malloc 去分配内存。
操作符重载 in c++
1
2
3
4
5
6
7
8
9
10
11
12
13
14
15
16
17
18
19
20
21
22
23
24
25
26
27
28
29
30
31
32
33
34
35
36
37
38
39
40
41
42
43
44
45
46
47
48
49
50
51
52
53
54
55
56
57
58
59
60
61
62
63
64
65
66
67
68
69
70
| #include <iostream>
class Vector2
{
private:
float x, y;
public:
Vector2(float x, float y): x(x), y(y) {}
float getX() const
{
return x;
}
float getY() const
{
return y;
}
Vector2 Add(const Vector2& other) const
{
return Vector2(x + other.x, y + other.y);
}
Vector2 Mutiplty(const Vector2& other) const
{
return Vector2(x * other.x, y * other.y);
}
Vector2 operator+(const Vector2& other) const
{
return Add(other);
}
Vector2 operator*(const Vector2& other) const
{
return Mutiplty(other);
}
bool operator==(const Vector2& other) const
{
return x == other.x && y == other.y;
}
bool operator!=(const Vector2& other) const
{
return !(*this == other);
}
};
std::ostream& operator<<(std::ostream& stream, Vector2& other)
{
stream << other.getX() << ", " << other.getY();
return stream;
}
int main() {
Vector2 v1(1.0f, 2.0f);
Vector2 v2(2.2f, 3.3f);
Vector2 v3 = v1 + v2;
std::cout << v1 << std::endl;
std::cout << v3.getX() << ", " << v3.getY() << std::endl;
std::cout << (v1 != v2) << std::endl;
}
|
this 是指向实例对象的指针
智能指针
作用域指针 unique_ptr
引用计数指针 shared_ptr
弱引用指针 weak_ptr
1
2
3
4
5
6
7
8
9
10
11
12
13
14
15
16
17
18
19
20
21
22
23
24
25
26
27
28
29
30
31
32
33
34
35
36
37
38
39
40
41
42
43
44
45
46
47
48
49
50
| #include <iostream>
#include <memory>
class Entity
{
Entity()
{
std::cout << "create entity" << std::endl;
}
~Entity()
{
std::cout << "destroy entity" << std::endl;
}
public:
void print() {}
};
int main() {
{
std::unique_ptr<Entity> entity = std::make_unique<Entity>();
entity->print();
}
{
std::shared_ptr<Entity> shared2;
{
std::shared_ptr<Entity> sharedEntity = std::make_shared<Entity>();
shared2 = sharedEntity;
sharedEntity->print();
}
}
{
std::weak_ptr<Entity> weakptr;
{
std::shared_ptr<Entity> sharedEntity = std::make_shared<Entity>();
weakptr = sharedEntity;
sharedEntity->print();
}
}
}
|
C++ 变量初始化列表:
1
2
3
4
5
6
7
| Vector2(float x, float y): x(x), y(y) {}
Vector2(float x, float y) {
this->x = x;
this->y = y;
}
|
C++ 中的 lambda 表达式
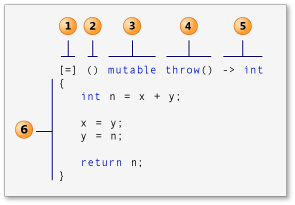
- capture 子句(在 C++ 规范中也称为 Lambda 引导。)
- 参数列表(可选)。 (也称为 Lambda 声明符)
- mutable 规范(可选)。
- exception-specification(可选)。
- trailing-return-type(可选)。
- Lambda 体。
capture 子句:Lambda 可在其主体中引入新的变量(用 C++14),它还可以访问(或“捕获”)周边范围内的变量。空 capture 子句 [ ]指示 lambda 表达式的主体不访问封闭范围中的变量。[&]
表示通过引用捕获引用的所有变量,而 [=]表示通过值捕获它们。可以使用默认捕获模式,然后为特定变量显式指定相反的模式。
1
2
3
4
| [&total, factor]
[factor, &total]
[&, factor]
[=, &total]
|
C++ #include “ “ 与 <>有什么区别?
在C++中,使用#include指令可以将头文件包含到源代码文件中。头文件通常包含了函数、类、结构体和变量的声明,以及其他预处理指令。
在使用#include指令时,可以使用双引号或尖括号来指定头文件的路径。使用双引号时,编译器会首先在当前源代码文件所在的目录中查找头文件;如果找不到,则会在编译器设置的路径中查找。而使用尖括号时,编译器只会在预定义的系统路径中查找头文件。
因此,使用双引号可以用来包含自己编写的头文件,而使用尖括号则用来包含系统提供的头文件。另外,使用双引号时,编译器还会在包含头文件的源文件的同一目录中查找头文件,这有助于组织相对路径的头文件。